Exodus - Temp Spoofer
At the bottom of the page will be trouble shooting steps:
READ EVERYTHING AND USE COMMON SENSE. NEVER EVER TEST ANYTHING ON SHOOTING RANGE.
If you're using the loader first time, it might reboot your PC a few times, open the loader again after restarts and continue.
Launch Steps for "Exodus External" Software:
DISABLE EVERYTHING RELATED TO SECURITY. WINDOWS DEFENDER, Windows PASSWORD/PIN (IN CASE OF SPOOFER USAGE) AND ANYTHING ELSE THAT PROTECTS THE SYSTEM. SPOOF ONLY AFTER LAUNCHING EGS OR UBI Connect.
1.Enable SteelSeries GG as admin and enable Sonar overlay (https://steelseries.com/gg). Read how to use it down below. Not required in case of using spoofer only.
2.Run the loader. Keep focus on the monitor that you need to have overlay on.
https://undetect.net/loader_exodus - loader
3.Paste your copied license key by pressing "Right Mouse Button" in loader and click the "Enter" button on your keyboard.
4.We have in-built "Cleaner" and "Spoofer". Loader will ask if you need them every launch (obviously doesn't happen if you use Spoofer only and it will ask about "Cleaner" only).
5.Launch the game once CMD is closed and wait till software menu appear in game main menu (can take up to three minutes). Menu key: Insert.
Trouble Shooting:
Please read all and don't make a ticket in the discord if the explanation is here.
Loader crashing in 1-3 seconds after launching
Download and install resources from the link:
https://aka.ms/vs/17/release/vc_redist.x64.exe
Restart your PC after installing it. Make sure to understand that it does not matter if you have it installed already. If loader closes itself and servers are up, you have to install or reinstall VC_Redist no matter what.
Loader Restarts PC more than 3 times
Firstly make sure that your PIN, Password or any other Windows login security is disabled.
After that, run PowerShell as admin and enter the commands below one by one:
takeown /F "C:\Windows\System32\hvix64.exe"
icacls "C:\Windows\System32\hvix64.exe" /grant *$(([System.Security.Principal.WindowsIdentity]::GetCurrent()).User.Value):F
takeown /F "C:\Windows\System32\hvax64.exe"
icacls "C:\Windows\System32\hvax64.exe" /grant *$(([System.Security.Principal.WindowsIdentity]::GetCurrent()).User.Value):F
del "C:\Windows\System32\hvix64.exe"
del "C:\Windows\System32\hvax64.exe"
If the fix above responds with "Access denied" please try PowerShell commands listed below, enter them one by one:
Rename-Item "C:\Windows\System32\hvix64.exe" "C:\Windows\System32\hvix641.exe"
Rename-Item "C:\Windows\System32\hvax64.exe" "C:\Windows\System32\hvax641.exe"
If none of the fixes above work, please disabled SVM/VT-X in BIOS and remove the HV related exe manually and then enable SVM/VT-X back on.
Obviously, PC restart required after all the changes.
Please make sure PIN is not set in Windows sign-in options
Firstly make sure that your PIN, Password or any other Windows login security is disabled.
After that, run PowerShell as admin and enter the commands below one by one:
takeown /F "C:\Windows\System32\hvix64.exe"
icacls "C:\Windows\System32\hvix64.exe" /grant *$(([System.Security.Principal.WindowsIdentity]::GetCurrent()).User.Value):F
takeown /F "C:\Windows\System32\hvax64.exe"
icacls "C:\Windows\System32\hvax64.exe" /grant *$(([System.Security.Principal.WindowsIdentity]::GetCurrent()).User.Value):F
del "C:\Windows\System32\hvix64.exe"
del "C:\Windows\System32\hvax64.exe"
If the fix above responds with "Access denied" please try PowerShell commands listed below, enter them one by one:
Rename-Item "C:\Windows\System32\hvix64.exe" "C:\Windows\System32\hvix641.exe"
Rename-Item "C:\Windows\System32\hvax64.exe" "C:\Windows\System32\hvax641.exe"
If none of the fixes above work, please disable SVM/VT-X in BIOS and remove the HV related exe manually and then enable SVM/VT-X back on.
Always restart your PC after using the PowerShell commands.
Unsupported firmware
To fix this error, convert the disk containing the operating system to GPT format using the built-in Windows tool mbr2gpt or any disk management utility of choice.
CRTICAL_PROCESS_DIED [BSOD]
Do NOT close the loader until the product download/loading is complete.
Mapper error
Downgrade or upgrade your Windows version or build. If did not help, use original version of Windows.
Failed to download files(1)
Try again or update Windows.
Either virtual or RAID disk is present
Turn off virtual disk or RAID in the BIOS and disable Intel Rapid Storage Technology (RST) if available. If this doesn't resolve the issue, find drivers/services that starts with "iaStor" by using DriverView or ProcessHacker to find them and disable the service. If all that didn't help, try reinstalling Windows.
Advanced fix:
Read this article to disable RAID/IRST as safe as possible in case if Windows was installed on RAID/IRST.
If you have IRST/RAID disabled, you need to disable all drivers/services that start with "iaStor" by using DriverView or ProcessHacker to find them, this article might help to get more information
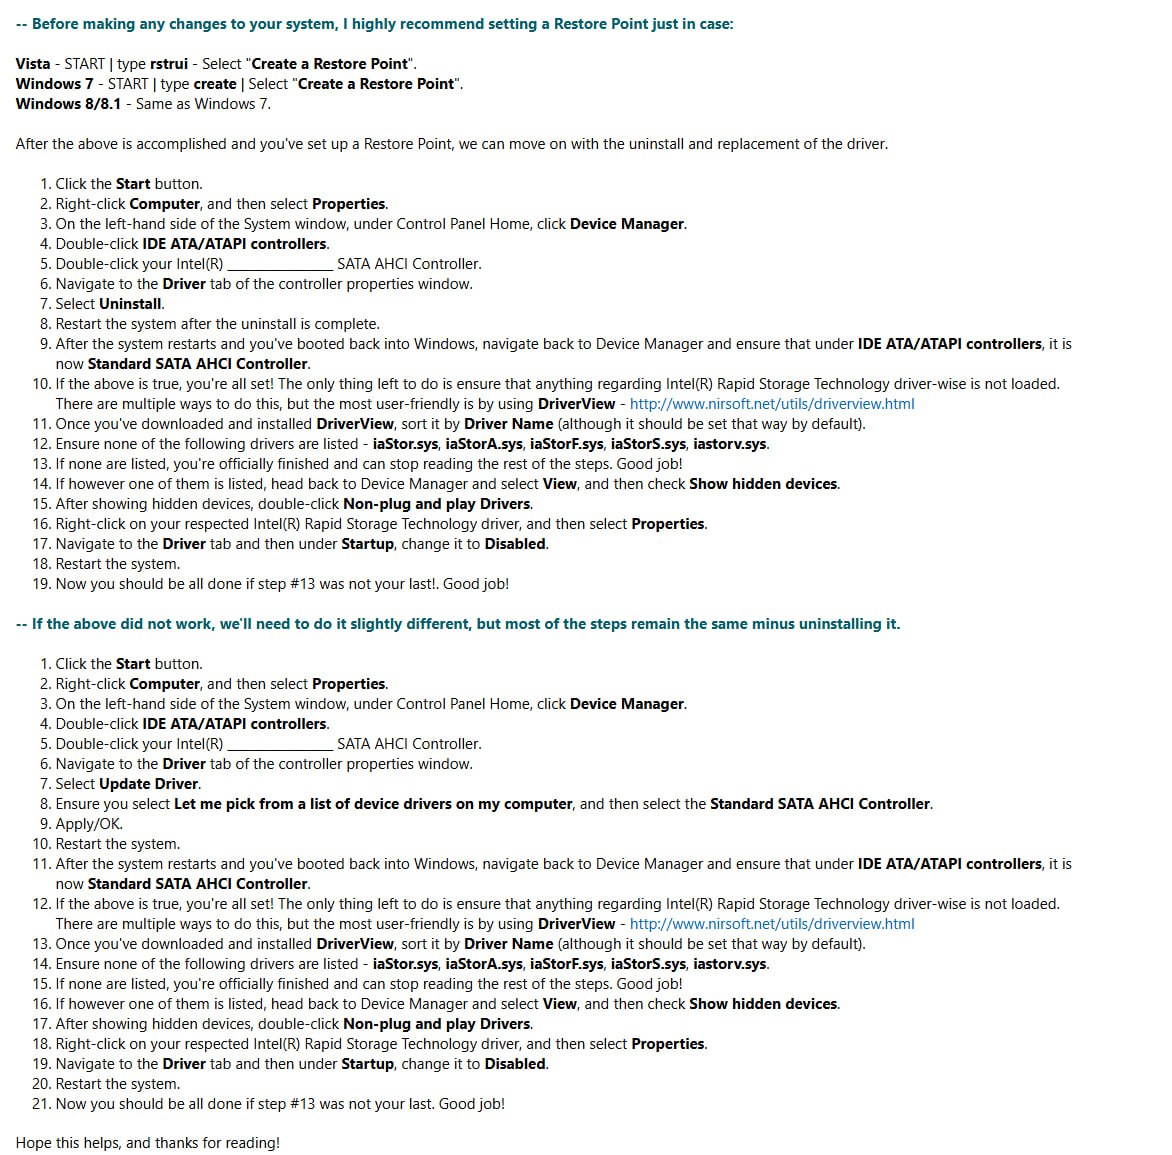
If RAID/Intel Rapid Storage disable already, please follow instructions on image below:
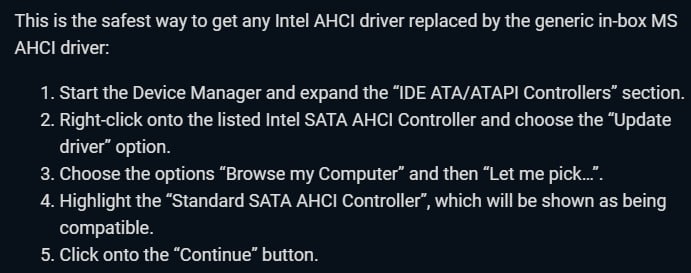
If did not help, please follow instructions on image below:
Failed to map memory
1.Make sure that you have 16 or more RAM in your PC.
2.Disable everything in Task Manager -> Startup and then try again after PC restart.
3.Make sure that loader located on PC and not on cloud space (e.g OneDrive, Mega.nz).
4.Download AutoRuns and disable everything that related to Microsoft/Windows/CurrentVersion/Run. But DO NOT touch anything else. Once done, save the changes and then restart your PC.
If none of the above worked = the problem on your side. Try to launch the product right after booting up Windows. If even that does not help, then your Windows is broken.
Incorrect HWID
Open CMD as administrator, enter these commands one by one:
wmic diskdrive get Caption, SerialNumber
wmic baseboard get SerialNumber
getmac
If any of those commands failed with an error then something is wrong with your PC, try to reinstall Windows and check if the problem is gone.
Failed to spoof hardware identifier(0x4)
Reboot your PC and try again. If that doesn't help then something else already spoofing hardware identifiers. Find out whatever it is and disable it.
Failed to load dependencies (1)(-5)
Download and run the .reg file and then reboot your PC. After reboot try to use the product again.
Incompatible HWID
HWID check error or HWID mismatch. Restart Windows and try again. If didn't work, request HWID reset on our Discord server.
Failed to load dependencies
Turn off / delete anti-virus or FaceIT/Vanguard anti-cheat. Restart your PC and try to launch the cheese again.
Please enable AMD-V (SVM) in BIOS
Enable AMD SVM in the BIOS.
Please enable Intel VT-X in the BIOS
Enable Intel VT-X in the BIOS.
VT-x/VMX/SVM is not supported
Run PowerShell as admin and use commands below:
Set-ExecutionPolicy RemoteSigned
After using the command above, restart your PC and download PowerShell file, open it as "txt" (double click on the ps1 file that you can download down below) file and then run PowerShell as admin and enter all commands one by one, once done restart your PC after copy-pasting all commands one by one: CLICK HERE.
Error 0x302
Restart your PC and try again.
SPACES disk is present
Disable Microsoft Storage Spaces on Control Panel -> Storage Spaces. That might wipe all data on the disk.
Please disable Intel Rapid Storage Technology
Please disable Intel Rapid Storage TechnologyRead this article to disable RAID/IRST.
If you have IRST/RAID disabled, you need to disable all drivers/services that start with "iaStor" by using DriverView or ProcessHacker to find them, this article might help to get more information
If RAID/Intel Rapid Storage disable already, please follow instructions on image below:
If did not help, please follow instructions on image below:
Black Screen once in a while (Delta Force/ABI)
Update your Windows to the absolute latest build.
Failed to delete hvax.exe(1)
Delete or rename "hvax64" manually by disabling SVM/VT-X/VT-D and deleting the file. After that SVM/VT-X/VT-D should be enabled back.
Failed to to init render
Disable integrated graphics on BIOS.
Please unload a third-party hypervisor
Restart your PC. If that didn't help, proceed to delete anything that using HyperVisor.
Please enable AHCI disk mode in BIOS
Disable IDE/RAID mode or anything else that is not AHCI.
AES instruction set is not supported
Your CPU does not support AES instructions, or AES is disabled in the BIOS. Make sure that AES enabled in BIOS.
Last updated